Power BI slicers are powerful tools for making data more interactive and customizable within reports. They allow users to filter visuals on the dashboard by selecting specific criteria, making it easy to narrow down data for quick insights. In this article, we’ll dive into what Power BI slicers are, how to set them up, and how to sync them across multiple pages to create a seamless user experience.
What Are Power BI Slicers?
Slicers are visual filters that allow you to control the visibility of data in other visuals on your Power BI report. They provide a clear and easy way for end-users to segment data based on the selected criteria. Slicers are particularly useful for reports that require frequent filtering by different categories, such as time periods, geographic regions, or product categories. With slicers, users can dynamically filter data and see updates across all visuals on the report page.
Types of Slicers in Power BI
Power BI offers various slicer options to fit different data needs:
- Category Slicers: Allows you to filter by categories like region, product type, etc.
- Date Slicers: Lets users filter data by date or time range.
- Numeric Range Slicers: Enables filtering data within a set range of values.
- Hierarchical Slicers: Allows multi-level filtering within a hierarchy, such as country > state > city.
- Dropdown and List Slicers: Offers filtering in list or dropdown format for space efficiency.
How to Use Slicers in Power BI
Setting up slicers in Power BI is straightforward and can enhance your dashboard’s functionality significantly. Here’s how to create and configure slicers in Power BI:
1. Add a Slicer to Your Report
- Go to the report page where you want to add a slicer.
- In the Visualizations pane, select the Slicer visual.
- From the Fields pane, drag a field (e.g., “Date,” “Region,” or “Product”) into the Values box within the slicer visual.

2. Customize the Slicer Format
- After adding the slicer, you can customize its appearance in the Format pane.
- Choose between List and Dropdown options based on your layout preferences.
- Use additional formatting options to adjust the font size, background color, border, and more.

3. Adjust Slicer Settings
- To fine-tune slicer behavior, use the Single Select and Multi-select options, which allow users to select one or multiple options simultaneously.
- If you’re using a date slicer, you can configure it to show options like Relative Date, Before/After, or Between for greater flexibility.

How to Sync Slicers Across Multiple Pages in Power BI
For dashboards spanning multiple pages, syncing slicers can help ensure a consistent user experience by carrying selected filters across all pages. Syncing slicers enables users to set a filter on one page and have that filter apply to visuals on other pages, creating a cohesive and uninterrupted view.
Step-by-Step Guide to Syncing Slicers
1. Add Slicers to All Relevant Pages
- Start by adding the slicers you want to sync on each page where you want the filters to apply.
- Ensure the slicers are based on the same data fields so that the filters align across pages.

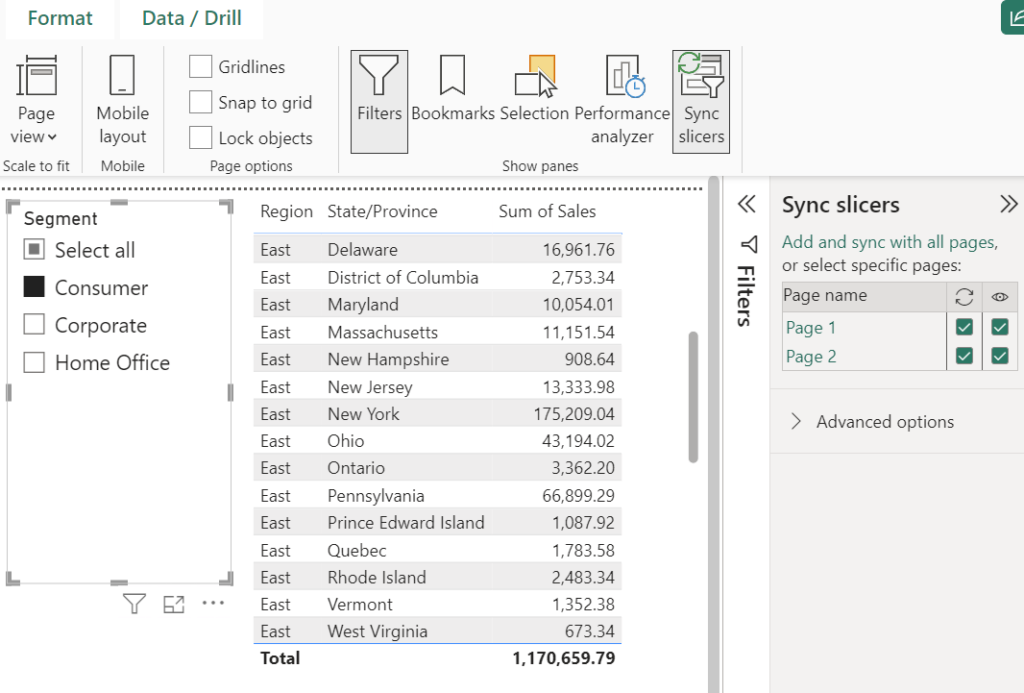
2. Open the Sync Slicers Pane
- In Power BI Desktop, go to the View tab on the top ribbon.
- Select Sync slicers. This opens the Sync Slicers pane on the right side of your screen.

3. Sync the Slicers Across Pages
- Click on the slicer you wish to sync, and in the Sync Slicers pane, you’ll see a list of report pages.
- Use the Sync checkboxes to choose which pages the slicer should filter.
- Under Visible, check whether the slicer should be visible on each page or hidden.
4. Test the Synced Slicers
- Select a filter option in the synced slicer and navigate across the report pages. The filter should apply consistently on each selected page.
- Make adjustments if needed to ensure all synced pages show the correct data.
5. Publish and Review
- When you’re satisfied with the synced slicer settings, publish your report to Power BI Service if necessary.
- Review the slicer behavior in the Service to ensure everything works as expected for end-users.
Best Practices for Using Power BI Slicers
Here are some tips to maximize the functionality of slicers on your Power BI dashboard:
- Limit the Number of Slicers: Too many slicers can clutter the dashboard and may overwhelm users. Keep the slicers to a minimum for a cleaner look.
- Use Dropdowns for Compact Layouts: If space is limited, switch your slicers to Dropdown mode. This saves space while keeping slicers accessible.
- Use Hierarchical Slicers for Multi-Level Filters: When dealing with multi-level categories, hierarchical slicers allow for more granular control without adding additional slicers.
- Test Synced Slicers for Accuracy: Always verify that synced slicers apply filters accurately across all pages. This is particularly important in complex reports where small discrepancies can affect data accuracy.
Discover more from Daily BI Talks
Subscribe to get the latest posts sent to your email.

